Registering with the Spanish local authorities is mandatory for non-EU citizens planning to reside in Spain for more than three months. The first step towards obtaining your identity card involves scheduling an appointment for fingerprinting within your first 30 days in the country.
Definitions
NIE: Número de Identificación de Extranjero
This is the Foreigner Identity Number assigned to you by the Spanish Consulate in your home country. Locate it inside your passport on the visa page. Use this number to open a bank account before obtaining your TIE.
TIE: Tarjeta de Identidad de Extranjero
This is the Foreigner Identity Card which replaces your NIE. This card identifies your residency status throughout your stay. For Language and Culture Assistants, the TIE remains valid until the conclusion of the school year.
Notes
Navigating the Spanish bureaucratic system during the TIE process will test your patience. During peak periods, notably September and October when Language and Culture Assistants arrive, the online appointment system may indicate “no available appointments.” Persistence is key. Please note that the appointment must be scheduled within your first 30 days in Spain, but the appointment itself can take place after this 30-day window.
Steps
Step One: Schedule Your Fingerprint Appointment Online
Upon arriving in Spain, go to the official website of the Spanish Ministry to schedule your fingerprint appointment. To obtain the security code confirming your appointment, use your Spanish phone number. Be aware that during the start of the school year, the website might display the message, “no hay citas disponibles.” Stay calm; additional appointments are regularly added, so be diligent in checking the website at different times throughout the day. If you’ve already secured housing, input your local address; otherwise, use your school’s address. Lastly, make sure your appointment date falls after your visa start date.
Step Two: Collect the Documents for Your Appointment
Make sure to have the following documents on hand:
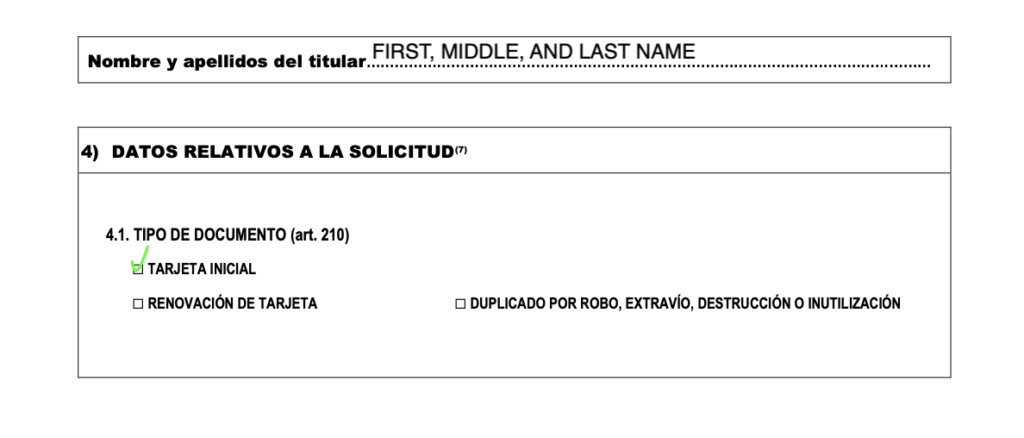
- Completed and signed EX17: Solicitud de Tarjeta de Identidad de Extranjero*
- Original and one extra copy
- Physical Passport and:
- One copy of the picture page
- One copy of the visa page
- One copy of the page stamped with your entry date into Spain
- If your passport was not stamped in Spain, include one copy of your boarding pass or ticket confirmation
- Carta de Nombramiento
- Original and one extra copy (available on AuxMadrid)
- One Passport Picture**
- Modelo 790 – Código 012 (Tax Form)
- Fingerprint Appointment Confirmation Document
- Proof of Insurance***
- Original and one extra copy
- Volante de Empadronamiento****
- Original and one extra copy
*Print two copies of the EX-17 form, sign each one, and bring them with you to the appointment. Refer to the images below for guidance on completing your EX-17 form.
**Take your passport photo in Spain, as the size specifications differ from other countries (1.25 x 1 inches). Conveniently, most metro stations house passport photo booths. If you’re unable to locate one nearby, contact your school representative for assistance.
***While proof of insurance is generally not mandatory, some police stations may request it. It is advisable to keep it readily accessible in case of potential inquiries.
****The volante de empadronamiento is an official requirement but certain officials might not request it. Only present the empadronamiento if specifically asked. If asked and you don’t possess the document yet, try negotiating with the official, and be prepared to reschedule until you have become empadronado. Some officials may accept alternative documentation that demonstrates your intention to reside in Spain (e.g. lease contract, bank paperwork, phone receipts, etc.). Have these documents on hand, just in case.

Step Three: Pay the Fee Prior to Your Appointment (Modelo 790-012)
Begin by entering your personal details in the Identificación section, using your local address or school address, if you have not found housing. Provide your Spanish phone number. In the Autoliquidación section, select Principal. Then, select “TIE que documenta la primera concesión de la autorización de residencia temporal, de estancia o para trabajadores transfronterizos.” In the Declarante section, enter your city in the Localidad. In the Ingreso section, check the En efectivo box. Leave the “Código de cuenta” box blank.
Download and print the document. There should be three copies: one for the Administration of the Foreigner’s Office (Administración), one for yourself (Interesado) and one for the bank (Entidad Colaboradora).
Take all three copies to the bank. The bank will keep the Entidad Colaboradora and return the stamped Administración and Interesado copies to you. Instead of stamps, some banks might issue a receipt, serving as confirmation of payment. Provide the Administración copy during your fingerprint appointment and keep the Interesado copy for your personal records.
Alternatively, you can make the payment at an ATM machine using your Spanish debit card. At the machine, select “payments and taxes,” followed by “payment by barcode.” Scan the barcode on your printed modelo 790-012 form and print the corresponding receipt. Bring this receipt along with all the printed pages of the tax form to your appointment.
Step Four: Attend Your Fingerprint Appointment
Once at the police station, pass through the security procedures and present your appointment confirmation to the security officer. They will direct you to the designated area. After you submit your documents and take your fingerprints, the official will provide you with a receipt (Resguardo). Do not lose this document, you will need it to collect your TIE card later!
Step Five: Pick Up Your TIE Card!
Around 30-45 days after your fingerprint appointment, schedule an online appointment to collect your TIE card. You will not receive a notification when it is ready. Visit the same website used to schedule your fingerprint appointment and choose “Policía – Recogida de Tarjeta de Identidad de Extranjero (TIE)” in the “Trámites Cuerpo Nacional de Policía” section. Select the same Police Station where you had your fingerprints taken. Remember to bring your Resguardo and physical passport to the appointment.
Conclusion
I sincerely hope this guide alleviates the challenges associated with obtaining your TIE card. It’s an inevitable hurdle that all Language and Culture Assistants must navigate, and undoubtedly one of the more arduous processes throughout your entire journey. It can be frustrating, especially when you watch some fortunate individuals effortlessly breeze through, while your process seems plagued by unexpected setbacks.
Consider my experience, for instance. It not only took nearly two weeks to secure an appointment, but during the appointment, I realized I had left my physical passport behind. After a choppy negotiation in Spanglish, I managed to persuade the official to allow me to return within a two-hour window that day. The ensuing drama unfolded with an Uber ride to the metro station, the slowest 30-minute metro ride, a frantic dash to my apartment, and the return trip to patiently wait in line until my designated official became available once again. With a mere 10 minutes to spare, I finally underwent the fingerprinting process.
Learn from my misstep, but more importantly, exercise patience and be kind to yourself. Should you have any questions, please ask in the comment section below.


